How to Present the Phonograms

How to Present the Programs
Directions and Tips for Teaching Phonograms
- Writing and Spelling Road to Reading and Thinking “Revised” Orton Phonograms
- Writing and Spelling Road to Reading and Thinking Phonogram CD
- #2 Pencils – no pens or mechanical pencils
- Red pencil – no pens or art pencils
- Half a ream of ½” paper with clock for Kindergarten
- Half a ream of 3/8” paper for 1st Grade and up
It is recommended that you as the parent/teacher take some time to familiarize yourself with the phonograms sounds [on the CD] and letter formation [on the back of the cards] before you begin and to understand the teaching techniques and information listed below as well as the information on the back of the phonogram cards.
Glossary
Phonogram – Is a combination of phoneme and grapheme. When these phonograms are spoken, they are phonemes; when they are written, they are graphemes.
Phoneme (sound/s) – An elementary sound of English speech.
“Elementary” Sound – One which cannot be further divided (these are never blends such as str, bl, or nd which simply combine two or more elementary sounds).
Grapheme (letter/s) – A written symbol (letter or letters) which represent a phoneme on paper, i.e., the phoneme /oo/ is commonly written with food, do, dew, due, fruit, through, you, shoe, neutral, two, lieu
Explicit phonics – “Explicit” refers to the how and when of phonics instruction, not the what and why. It simply means to teach the sound/symbol relationships, in isolation, first, then apply these learned relationships to words.
Methodologies Used
Multi-sensory Instruction
The most important component of this program, which enables virtually every learner to learn, is the simultaneous multi-sensory methodology used to teach it. Each student’s “learning style” is addressed, neurologically, through four avenues to the mind:
• Sight • Sound • Voice • Writing
Students SEE the symbol [grapheme], HEAR the teacher SAY the sound/s; they repeat or SAY the sound/s an WRITE the symbol [grapheme] from dictated, oral instructions. Thus, the teacher teaches through each student’s stronger learning avenue(s) while, simultaneously, remedying the weaker ones. The instruction is identical for individual or classroom instruction. This multi-sensory technique is used throughout the program to:
• Accelerate the learning process
• Avoid discrimination against any student’s individual “learning style”
• Provide “an EQUAL and OPTIMAL learning opportunity for each student”
Direct Instruction Techniques (“I need your attention”; “Object of today’s lesson”; “Why do you need to learn this?” “Watch me do it.” “Let’s do it together.” “Check your work with mine.” “Now, you try it alone”, “Practice to mastery”) Dictation Cognitive skills are developed thoroughly and much more quickly through dictation rather than copying or completing worksheets. Illustrating through student-built resource materials; students develop self-confidence & self- esteem when they acquire independent learning skills with the use of resources they understand & which are handy for immediate use. Socratic Instruction Student/teacher Socratic dialogue promotes thinking and
analyzing with teachers asking questions of the student/s rather than telling them the answers.
Teaching Notes
- Teach the sound/s as they are given in the key words, in the order shown, and with any listed instructions. *Do not give key words; See below.
- We do not use letter names
- It is not necessary to teach letter names at this point since they are not heard in English speech except for (sometimes) the vowels. At first, you are trying to establish the unknown symbols (letters) for the known sound/s children have been using in conversation. We sound, ‘k’ ‘ă’ ‘t’ for ‘cat’ – not ‘see-a-tee.’
- Sounds are presented in “isolation” with no key words, “sing-songs” or pictures
- Sound key words on the back are a tool for sound pronunciation only not to be presented with the phonogram.
- There are 7 phonograms that have a “word” in their description and sound; these need to be used to denote the different letters since their sound is the same: er [the er of] (her) ir (first) ur (nurse) wor (works) ear (early) oa [the o of] boat, oe (toe)
- Students must be able to hold a pencil properly and write
- CD is for parent/teacher use only – this is not used to teach the students the sounds
- Students learn 4 phonograms per day [Kindergarten 2 per day]; students will add phonograms, mix and test every day until all 71 are learned
- Phonograms are written across the page; spacing methods are used to prepare students for sentence writing. [bcdfglmn sh oa qu aw prstv ch]
Clock Face & Letter Strokes
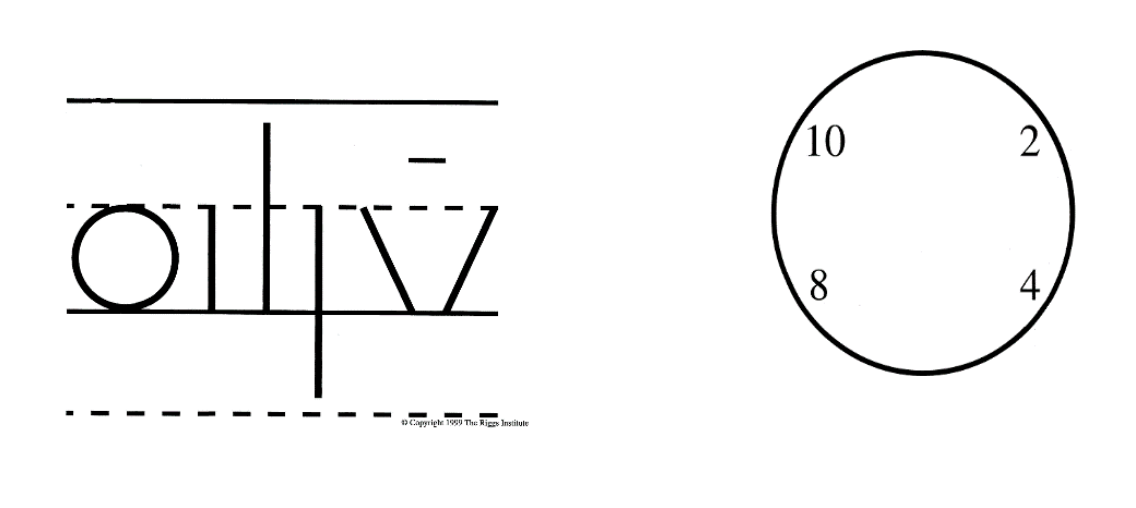
Letters are formed with 7 simple strokes; students need to learn these strokes to form the letters. For beginning students, it is helpful to take some time to teach and have them practice the letter strokes and explain the clock face reference points before phonogram instruction begins. Additionally, if you are working with an older student who needs to improve their
penmanship it is suggested they also follow the dictation. *Scribble and nonsense writing should not be tolerated or encouraged.
Dictation
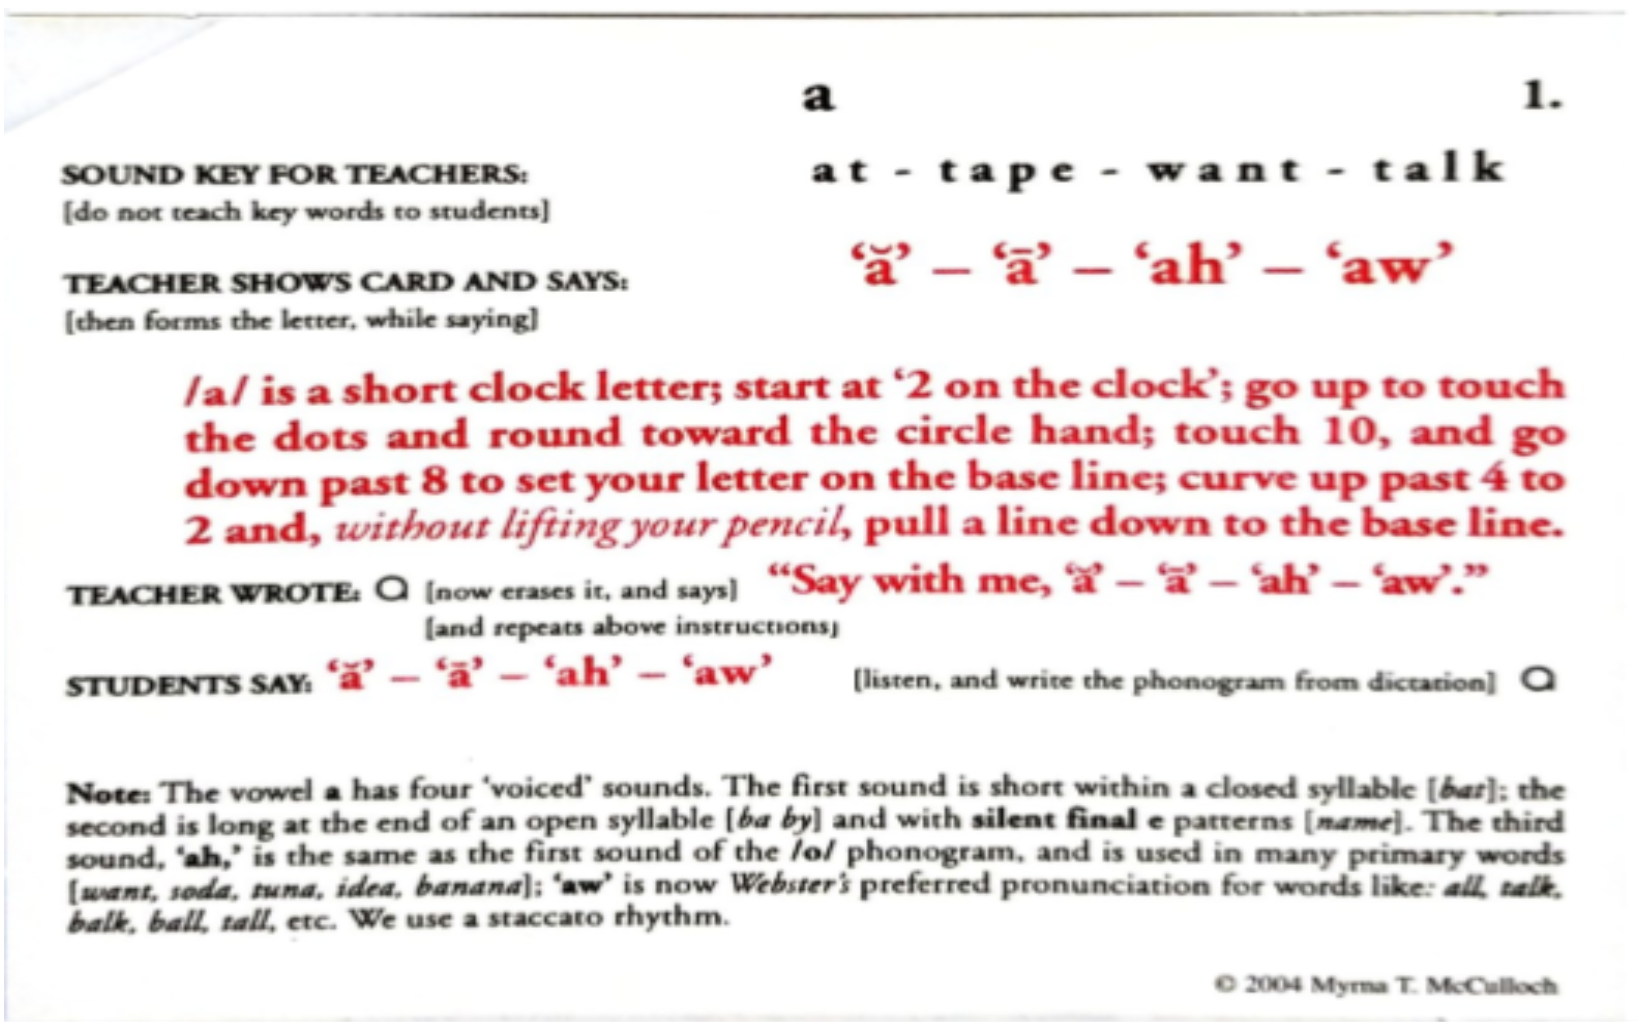
/a/ [Say all sounds as ă – ā – ah -aw]
is a short clock letter [Demonstrate the formation of the phonogram /a/ on your board or paper as you “talk” through the dictation on the back of the card.]
“Start at 2 on the clock [Begin to make your letter.]
go up and touch the dots, and [Round up to the middle, dotted line.]
round to the circle hand [Start toward 10 and have your students note where their own circle hand is.]
touch 10 and go down past 8 to set your letter on the base line [You should have reached 6 on the base line.]
curve up past 4 to 2 [at the point of your beginning.]
and, without lifting the pencil, [STRESS this point]
pull a line down to the base line.” [You should end below 4.]
Erase the visual you have made [This is important, students learn better by doing than copying]
Repeat the sound/s and have the students say the sound/s along with you
Say, “Put your pencil point down at 2 on the clock and dictate the above instructions [These instructions are on the back of the phonogram card]
Practice
Once students have mastered the formation of any given phonogram, you will still want to continue using the cards to help them practice the phonograms, but you will no longer give detailed instructions on how to form the letter. You hold up the card so that the student can SEE the phonogram, and you will say the sound/s so that the student can HEAR it. The student will then immediately SAY the phonogram as they WRITE it on their practice paper. This is called simultaneous multi-sensory practice. Teach the student that it helps form important connections in their brain. “Practice to mastery” After you introduce each new phonogram, have the student practice writing the phonogram (while saying the sound/s). The more often they practice, the sooner they will get the phonogram into their long-term memory. Many parents and teachers have their students practice for a few minutes at a time throughout the day. The student should practice writing and saying any phonograms that has not been mastered, always working to have their letters touch the “checkpoints” so that their penmanship skills improve along with their knowledge of the phonograms.
Testing
The student is tested daily on the phonograms. Do not test in learned order, mix the phonogram cards before each test. Students are tested by sound only; teachers should not hold the phonogram card up so student(s) can copy. To test the teacher says the sound/s and has the student repeat the sound and write it on their paper, continue until all sounds that they have been taught are presented. If the student did not know or write a phonogram, they should underline the line where the letter would have been placed. Students will then “become the teacher” as they tell you what they have written and correct their own tests. Students say each sound aloud as you write them on the board, after each sound is written you ask the students “Does your paper match my board?” If so, they do nothing. If not, what is the error? If they left a blank space (drew an underline) while taking the test, have them use their red pencil to write the correct phonogram in the blank space. If they wrote the wrong phonogram, have them use their red pencil to turn it into the correct phonogram, superimposing the correct phonogram over the incorrect phonogram. Make sure you help your students with the correction; but have them do the correcting themselves.
[bcdfglmn sh oa qu au prstv ch]
Homework
It is suggested that students write their new phonograms 5-10 times [depending on age]. As the students write each phonogram, they should say the sound/s:
“ă – ā – ah -aw” as they write the letter
“ă – ā – ah -aw” as they write the letter, etc.
You can find more information about the Writing and Spelling Road to Reading and Thinking by visiting our website. www.riggsinst.org
Catalog/Overview https://www.riggsinst.org/wp-content/uploads/2020/01/Updated-Riggs-Overview-and-Catalog1jan2020.pdf
Riggs Content: What We Teach https://www.riggsinst.org/services-stab-phonetic-system/
Riggs Institute Blog http://blog.riggsinst.com/